神经风格转换
先引入需要的包:
1 | import os |
使用一个预先训练好的 19 层的 VGG-19 网络进行迁移学习,下面加载预训练模型:
1 | model = load_vgg_model("pretrained-model/imagenet-vgg-verydeep-19.mat") |
load_vgg_model() 函数为
1
2
3
4
5
6
7
8
9
10
11
12
13
14
15
16
17
18
19
20
21
22
23
24
25
26
27
28
29
30
31
32
33
34
35
36
37
38
39
40
41
42
43
44
45
46
47
48
49
50
51
52
53
54
55
56
57
58
59
60
61
62
63
64
65
66
67
68
69
70
71
72
73
74
75
76
77
78
79
80
81
82
83
84
85
86
87
88
89
90
91
92
93
94
95
96
97
98
99
100
101
102
103
104
105
106
107
108
109
110
111
112
113
114
115
116
117
118
119
120
121
122
123
124
125
126
127
128
129
130
131
132
133
134
135
136
137class CONFIG:
IMAGE_WIDTH = 400
IMAGE_HEIGHT = 300
COLOR_CHANNELS = 3
NOISE_RATIO = 0.6
MEANS = np.array([123.68, 116.779, 103.939]).reshape((1,1,1,3))
VGG_MODEL = 'pretrained-model/imagenet-vgg-verydeep-19.mat' # Pick the VGG 19-layer model by from the paper "Very Deep Convolutional Networks for Large-Scale Image Recognition".
STYLE_IMAGE = 'images/stone_style.jpg' # Style image to use.
CONTENT_IMAGE = 'images/content300.jpg' # Content image to use.
OUTPUT_DIR = 'output/'
def load_vgg_model(path):
"""
Returns a model for the purpose of 'painting' the picture.
Takes only the convolution layer weights and wrap using the TensorFlow
Conv2d, Relu and AveragePooling layer. VGG actually uses maxpool but
the paper indicates that using AveragePooling yields better results.
The last few fully connected layers are not used.
Here is the detailed configuration of the VGG model:
0 is conv1_1 (3, 3, 3, 64)
1 is relu
2 is conv1_2 (3, 3, 64, 64)
3 is relu
4 is maxpool
5 is conv2_1 (3, 3, 64, 128)
6 is relu
7 is conv2_2 (3, 3, 128, 128)
8 is relu
9 is maxpool
10 is conv3_1 (3, 3, 128, 256)
11 is relu
12 is conv3_2 (3, 3, 256, 256)
13 is relu
14 is conv3_3 (3, 3, 256, 256)
15 is relu
16 is conv3_4 (3, 3, 256, 256)
17 is relu
18 is maxpool
19 is conv4_1 (3, 3, 256, 512)
20 is relu
21 is conv4_2 (3, 3, 512, 512)
22 is relu
23 is conv4_3 (3, 3, 512, 512)
24 is relu
25 is conv4_4 (3, 3, 512, 512)
26 is relu
27 is maxpool
28 is conv5_1 (3, 3, 512, 512)
29 is relu
30 is conv5_2 (3, 3, 512, 512)
31 is relu
32 is conv5_3 (3, 3, 512, 512)
33 is relu
34 is conv5_4 (3, 3, 512, 512)
35 is relu
36 is maxpool
37 is fullyconnected (7, 7, 512, 4096)
38 is relu
39 is fullyconnected (1, 1, 4096, 4096)
40 is relu
41 is fullyconnected (1, 1, 4096, 1000)
42 is softmax
"""
vgg = scipy.io.loadmat(path)
vgg_layers = vgg['layers']
def _weights(layer, expected_layer_name):
"""
Return the weights and bias from the VGG model for a given layer.
"""
wb = vgg_layers[0][layer][0][0][2]
W = wb[0][0]
b = wb[0][1]
layer_name = vgg_layers[0][layer][0][0][0][0]
assert layer_name == expected_layer_name
return W, b
return W, b
def _relu(conv2d_layer):
"""
Return the RELU function wrapped over a TensorFlow layer. Expects a
Conv2d layer input.
"""
return tf.nn.relu(conv2d_layer)
def _conv2d(prev_layer, layer, layer_name):
"""
Return the Conv2D layer using the weights, biases from the VGG
model at 'layer'.
"""
W, b = _weights(layer, layer_name)
W = tf.constant(W)
b = tf.constant(np.reshape(b, (b.size)))
return tf.nn.conv2d(prev_layer, filter=W, strides=[1, 1, 1, 1], padding='SAME') + b
def _conv2d_relu(prev_layer, layer, layer_name):
"""
Return the Conv2D + RELU layer using the weights, biases from the VGG
model at 'layer'.
"""
return _relu(_conv2d(prev_layer, layer, layer_name))
def _avgpool(prev_layer):
"""
Return the AveragePooling layer.
"""
return tf.nn.avg_pool(prev_layer, ksize=[1, 2, 2, 1], strides=[1, 2, 2, 1], padding='SAME')
# Constructs the graph model.
graph = {}
# 此处将输入作为 variable,使得优化器知道更新其参数
graph['input'] = tf.Variable(np.zeros((1, CONFIG.IMAGE_HEIGHT, CONFIG.IMAGE_WIDTH, CONFIG.COLOR_CHANNELS)), dtype = 'float32')
graph['conv1_1'] = _conv2d_relu(graph['input'], 0, 'conv1_1')
graph['conv1_2'] = _conv2d_relu(graph['conv1_1'], 2, 'conv1_2')
graph['avgpool1'] = _avgpool(graph['conv1_2'])
graph['conv2_1'] = _conv2d_relu(graph['avgpool1'], 5, 'conv2_1')
graph['conv2_2'] = _conv2d_relu(graph['conv2_1'], 7, 'conv2_2')
graph['avgpool2'] = _avgpool(graph['conv2_2'])
graph['conv3_1'] = _conv2d_relu(graph['avgpool2'], 10, 'conv3_1')
graph['conv3_2'] = _conv2d_relu(graph['conv3_1'], 12, 'conv3_2')
graph['conv3_3'] = _conv2d_relu(graph['conv3_2'], 14, 'conv3_3')
graph['conv3_4'] = _conv2d_relu(graph['conv3_3'], 16, 'conv3_4')
graph['avgpool3'] = _avgpool(graph['conv3_4'])
graph['conv4_1'] = _conv2d_relu(graph['avgpool3'], 19, 'conv4_1')
graph['conv4_2'] = _conv2d_relu(graph['conv4_1'], 21, 'conv4_2')
graph['conv4_3'] = _conv2d_relu(graph['conv4_2'], 23, 'conv4_3')
graph['conv4_4'] = _conv2d_relu(graph['conv4_3'], 25, 'conv4_4')
graph['avgpool4'] = _avgpool(graph['conv4_4'])
graph['conv5_1'] = _conv2d_relu(graph['avgpool4'], 28, 'conv5_1')
graph['conv5_2'] = _conv2d_relu(graph['conv5_1'], 30, 'conv5_2')
graph['conv5_3'] = _conv2d_relu(graph['conv5_2'], 32, 'conv5_3')
graph['conv5_4'] = _conv2d_relu(graph['conv5_3'], 34, 'conv5_4')
graph['avgpool5'] = _avgpool(graph['conv5_4'])
return graph

模型被我们存进了一个 dict,dict 的 key 是每一层的名字,value 是这一层的值。
我们可以对某一层进行赋值,例如对输入进行赋值:
1 | model["input"].assign(image) |
如果想得到某一层的值,我们可以:
1 | sess.run(model["conv4_2"]) |
内容损失函数
内容损失函数是内容图片前向传播的某一层的激活值 a_C 和生成图片前向传播的某一层的激活值 a_G 之间的差距,一般来说我们选取中间层的激活值更能代表图片的内容。
1 | def compute_content_cost(a_C, a_G): |
风格代价函数
风格矩阵
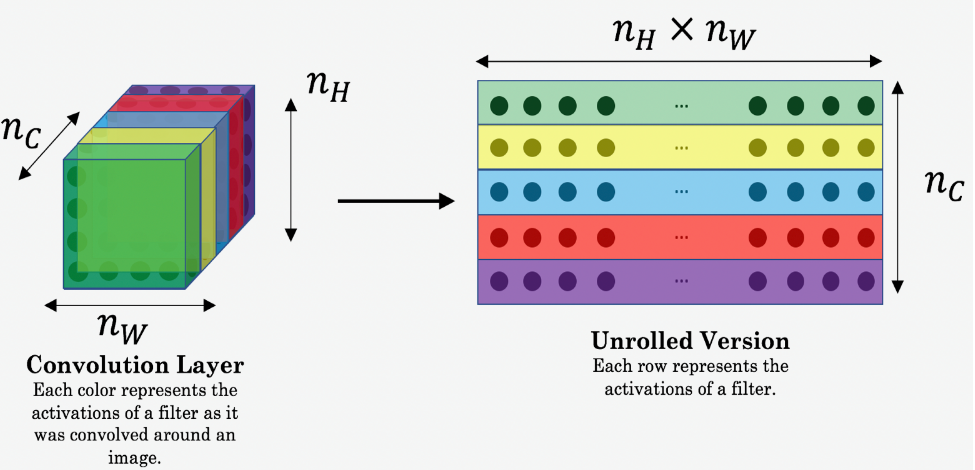
风格矩阵代表了某张图片的风格,用某一层的激活值的格拉姆矩阵表示,也就是这一层各个通道之间的相关性,具体的步骤为:先将某一层激活值展开成二维矩阵,风格矩阵就是这个二维矩阵叉乘它的转置矩阵。


风格矩阵的斜对角,是某个通道自己和自己的相关性,表示某个通道的活跃程度。
1 | # 风格矩阵生成 |
风格代价函数
对于某一层而言,这一层的风格代价函数是,生成图片在这一层的风格矩阵和风格图片在这一层的风格矩阵的“距离”。
1 | # 某一层的风格代价函数 |
最后总的风格代价函数是每一层的风格代价值用不同的权重组合起来,权重存放在一个字典里:
1 | STYLE_LAYERS = [ |
加上权重之后总的风格代价函数为:
1 | def compute_style_cost(model, STYLE_LAYERS): |
总的代价函数
1 | def total_cost(J_content, J_style, alpha = 10, beta = 40): |
进行训练
步骤为:
- 创建对话
- 加载内容图片 C
- 加载风格图片 S
- 随机初始化需要生成的图片 G
- 加载预训练模型 VGG
- 建立 tensorflow 图:
- 将内容图片通过 VGG 模型计算内容代价函数
- 将风格图片通过 VGG 模型计算风格代价函数
- 计算总代价函数
- 定义优化器和学习率
- 初始化计算图用很大的迭代数运行,每一步都更新一次生成图片 G
创建对话:
1 | # 重设计算图 |
加载内容图片 C 并进行 reshape 和 归一化处理:
1 | content_image = scipy.misc.imread("images/1.jpg") |
归一化函数
1
2
3
4
5
6
7
8
9
10
11
12def reshape_and_normalize_image(image):
"""
Reshape and normalize the input image (content or style)
"""
# Reshape image to mach expected input of VGG16
image = np.reshape(image, ((1,) + image.shape)) # (1,)+(400,300,3)=(1,400,300,3)
# Substract the mean to match the expected input of VGG16
image = image - CONFIG.MEANS
return image
加载风格图片 S 并进行归一化处理:
1 | style_image = scipy.misc.imread("images/2.jpg") |
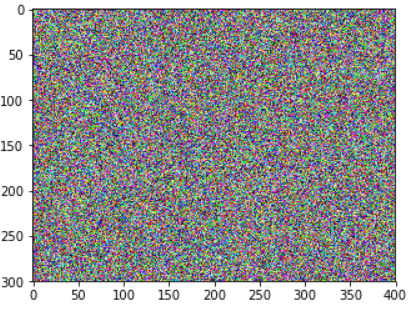
现在用噪音初始化生成图片 G,虽然每个像素是随机的噪声,但还是与内容图片 C 相关,噪声和 C 以一定的权重叠加,使得在更新 G 的像素时能更快地匹配到内容图片。
1 | generated_image = generate_noise_image(content_image) |
生成噪声的函数
1
2
3
4
5
6
7
8
9
10
11
12def generate_noise_image(content_image, noise_ratio = CONFIG.NOISE_RATIO):
"""
Generates a noisy image by adding random noise to the content_image
"""
# Generate a random noise_image
noise_image = np.random.uniform(-20, 20, (1, CONFIG.IMAGE_HEIGHT, CONFIG.IMAGE_WIDTH, CONFIG.COLOR_CHANNELS)).astype('float32')
# Set the input_image to be a weighted average of the content_image and a noise_image
input_image = noise_image * noise_ratio + content_image * (1 - noise_ratio)
return input_image

加载预训练模型:
1 | model = load_vgg_model("pretrained-model/imagenet-vgg-verydeep-19.mat") |
构建计算图:
选取某一层计算内容代价函数
1
2
3
4
5
6
7
8
9
10
11
12
13
14
15
16# Assign the content image to be the input of the VGG model.
sess.run(model['input'].assign(content_image))
# Select the output tensor of layer conv4_2
out = model['conv4_2']
# Set a_C to be the hidden layer activation from the layer we have selected
a_C = sess.run(out)
# Set a_G to be the hidden layer activation from same layer. Here, a_G references model['conv4_2']
# and isn't evaluated yet. Later in the code, we'll assign the image G as the model input, so that
# when we run the session, this will be the activations drawn from the appropriate layer, with G as input.
a_G = out
# Compute the content cost
J_content = compute_content_cost(a_C, a_G)计算风格代价函数
1
2
3
4
5# Assign the input of the model to be the "style" image
sess.run(model['input'].assign(style_image))
# Compute the style cost
J_style = compute_style_cost(model, STYLE_LAYERS)计算总的代价函数
1
2# 总代价函数
J = total_cost(J_content, J_style, alpha = 10, beta = 80)定义优化器
1
2
3
4
5# define optimizer
optimizer = tf.train.AdamOptimizer(2.0)
# define train_step,选择优化对象,总代价函数 J
train_step = optimizer.minimize(J)
下面进行训练:
1 | def model_nn(sess, input_image, num_iterations = 200): |
其中保存图片的函数
1
2
3
4
5
6
7
8def save_image(path, image):
# Un-normalize the image so that it looks good 去归一化
image = image + CONFIG.MEANS
# Clip and Save the image
image = np.clip(image[0], 0, 255).astype('uint8') # 这一句将元素的值限制在 0~255 之间
scipy.misc.imsave(path, image)
测试
1 | model_nn(sess, generated_image) |

结论
What you should remember:
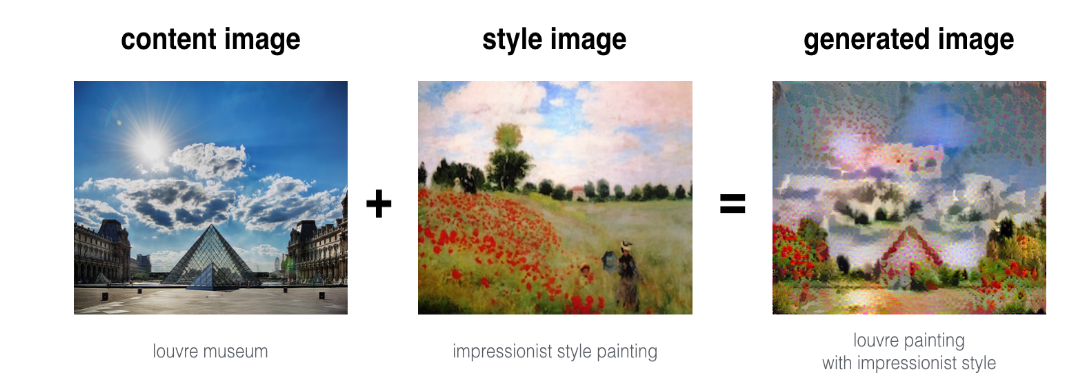
- Neural Style Transfer is an algorithm that given a content image C and a style image S can generate an artistic image
- It uses representations (hidden layer activations) based on a pretrained ConvNet.
- The content cost function is computed using one hidden layer’s activations.
- The style cost function for one layer is computed using the Gram matrix of that layer’s activations. The overall style cost function is obtained using several hidden layers.
- Optimizing the total cost function results in synthesizing new images.
人脸识别
- 使用三重损失函数
- 使用预训练模型来对人脸图片进行编码
- 使用这些编码来实现人脸验证和人脸识别
照例先引入需要的包:
1 | from keras.models import Sequential |
三重损失
由于我们采用预训练模型,不需要对三重损失进行优化,但是还是有必要知道如何实现。
- A 为锚照片,P 为正例,N 为反例,$\alpha$ 是一个裕度
- f() 表示照片经过模型的输出向量,也就是编码
- $[ \ \ ]_+$表示取和 0 相比的较大值
为了能在 keras 模型的编译环节使用,我们使用 keras 中损失函数的格式进行自定义 loss 函数:
1 | def triplet_loss(y_true, y_pred, alpha = 0.2): |
加载预训练模型
我们使用别人训练好的一个 Inception 网络来对图片进行编码。
- 输入形状为 $(m, n_C, n_H, n_W) = (m, 3, 96, 96)$ 的图片
- 输出形状为 $(m, 128)$ 的图片编码
1 | FRmodel = faceRecoModel(input_shape=(3, 96, 96)) |
编译模型并加载权重:
1 | FRmodel.compile(optimizer = 'adam', loss = triplet_loss, metrics = ['accuracy']) |
具体的函数细节见 iwantooxxoox 的 github。
人脸识别和验证
首先我们要建立一个数据库,里面存放了所有的需要识别或验证的人的照片通过神经网络的编码。
1 | database = {} |
其中获取编码的函数:
1 | def img_to_encoding(image_path, model): |
人脸检验
所谓人脸检验就是在识别时提供人脸照片和 ID 号,用来验证是不是本人,1 对 1 的问题。
1 | def verify(image_path, identity, database, model): |
人脸识别
人脸识别不再提供 ID 号,只提供人脸照片,然后与数据库里的编码进行比对,找出与之距离最小的,如果距离小于某个阈值,则我们认定他是数据库中的人。
1 | def who_is_it(image_path, database, model): |
算法的改进
- Put more images of each person (under different lighting conditions, taken on different days, etc.) into the database. Then given a new image, compare the new face to multiple pictures of the person. This would increae accuracy.
- Crop the images to just contain the face, and less of the “border” region around the face. This preprocessing removes some of the irrelevant pixels around the face, and also makes the algorithm more robust.
结论
- Face verification solves an easier 1:1 matching problem; face recognition addresses a harder 1:K matching problem.
- The triplet loss is an effective loss function for training a neural network to learn an encoding of a face image.
- The same encoding can be used for verification and recognition. Measuring distances between two images’ encodings allows you to determine whether they are pictures of the same person.


