Keras 教程
- Keras 是一个高级神经网络框架,用 Python 写成,在 TensorFlow 和 CNTK 等一些更低级的框架上运行,拥有比 tensorflow 更高的抽象
- Keras 能够快速搭建和试验不同的模型
- Keras 比低级框架限制更多,无法实现一些非常复杂的模型,但是对一些普通模型运行很好
这里用 Keras 实现一个识别图片中的人是否开心的算法。
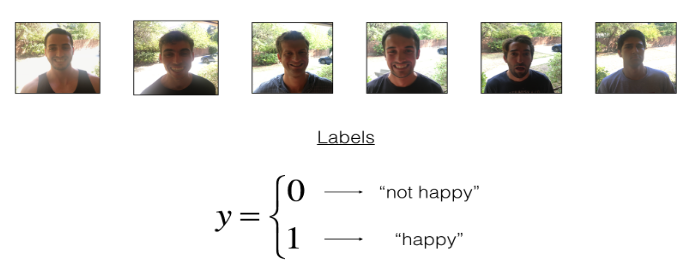
先引入我们需要的包:
1 | import numpy as np |
加载数据集:
1 | X_train_orig, Y_train_orig, X_test_orig, Y_test_orig, classes = load_dataset() |
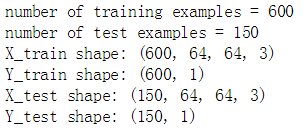
在 Keras 中训练测试模型有四个步骤:
建立模型
自己定义一个 model() 函数进行前向传播
1
2
3
4
5
6
7
8
9
10
11
12
13
14
15
16
17
18
19
20
21
22
23
24
25
26
27
28
29
30
31def HappyModel(input_shape):
"""
Implementation of the HappyModel.
Arguments:
input_shape -- 输入图片的维度(不包括图片的数量!)
Returns:
model -- a Model() instance in Keras
"""
X_input = Input(input_shape)
# Zero-Padding: pads the border of X_input with zeroes
X = ZeroPadding2D((3, 3))(X_input)
# CONV -> BN -> RELU Block applied to X
X = Conv2D(32, (7, 7), strides = (1, 1), name = 'conv0')(X)
X = BatchNormalization(axis = 3, name = 'bn0')(X)
X = Activation('relu')(X)
# MAXPOOL
X = MaxPooling2D((2, 2), name='max_pool')(X)
# FLATTEN X (means convert it to a vector) + FULLYCONNECTED
X = Flatten()(X)
X = Dense(1, activation='sigmoid', name='fc')(X)
# Create model. This creates your Keras model instance, you'll use this instance to train/test the model.
model = Model(inputs = X_input, outputs = X, name='HappyModel')
return model1
happyModel = HappyModel(X_train.shape[1:])
编译模型
model.compile(optimizer = “…”, loss = “…”, metrics = [“accuracy”])
1
happyModel.compile(optimizer = 'Adam', loss = 'binary_crossentropy', metrics = ['accuracy'])
在训练数据上训练模型
model.fit(x = …, y = …, epochs = …, batch_size = …)
1
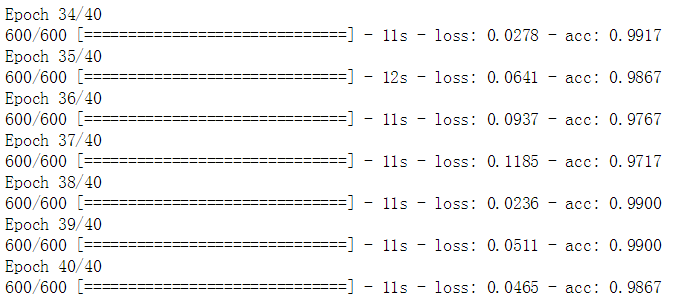
happyModel.fit(x = X_train, y = Y_train, epochs = 40, batch_size = 16)
在测试数据上测试模型
model.evaluate(x = …, y = …)
1
2
3
4preds = happyModel.evaluate(x = X_test, y = Y_test)
print(preds)
print ("Loss = " + str(preds[0]))
print ("Test Accuracy = " + str(preds[1]))
最后可以达到 98% 的训练集精确度,90% 的训练集精确度。
我们可以用自己的图片进行测试:
1 | img_path = 'images/45.jpg' # 用自己的图片路径 |
我们还可以获得模型的概况:
1 | happyModel.summary() |
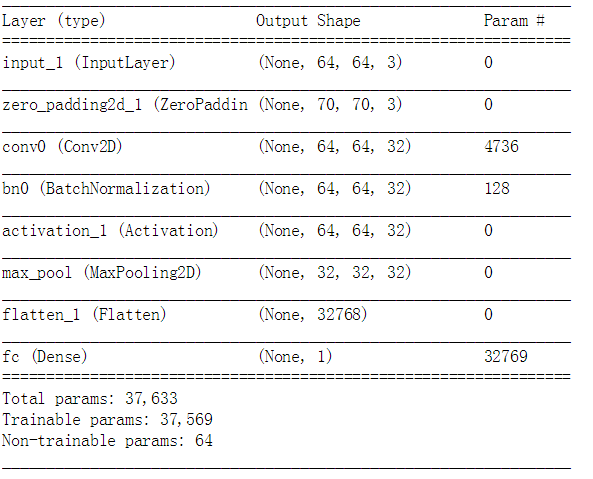
还可以将模型流程图打印出来并保存为位图文件:
1 | plot_model(happyModel, to_file='HappyModel.png') |
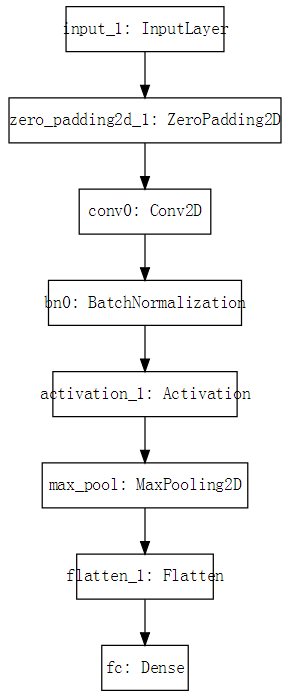
用 Keras 创建 ResNet 残差网络
这节会用残差网络创建一个非常深的卷积网络。
- 实现基本的残差网络组块
- 将这些组块合在一起实现一个最先进的神经网络图像分类器
包
1 | import numpy as np |
非常深的神经网络的问题所在
- 优点:很深的网络能学习到非常多层次的抽象特征,从边缘到复杂特征。
- 缺点:训练时会产生梯度下降,使得训练速度极慢。
残差网络的基本 block 组块
有两种主要的组块在残差网络中,取决于输入/输出维度是否相同。
The identity block (输入/输出维度相同)

First component of main path:
- The first CONV2D has $F_1$ filters of shape (1,1) and a stride of (1,1). Its padding is “valid” and its name should be
conv_name_base + '2a'. Use 0 as the seed for the random initialization. - The first BatchNorm is normalizing the channels axis. Its name should be
bn_name_base + '2a'. - Then apply the ReLU activation function. This has no name and no hyperparameters.
Second component of main path:
- The second CONV2D has $F_2$ filters of shape $(f,f)$ and a stride of (1,1). Its padding is “same” and its name should be
conv_name_base + '2b'. Use 0 as the seed for the random initialization. - The second BatchNorm is normalizing the channels axis. Its name should be
bn_name_base + '2b'. - Then apply the ReLU activation function. This has no name and no hyperparameters.
Third component of main path:
- The third CONV2D has $F_3$ filters of shape (1,1) and a stride of (1,1). Its padding is “valid” and its name should be
conv_name_base + '2c'. Use 0 as the seed for the random initialization. - The third BatchNorm is normalizing the channels axis. Its name should be
bn_name_base + '2c'. Note that there is no ReLU activation function in this component.
Final step:
- The shortcut and the input are added together.
- Then apply the ReLU activation function. This has no name and no hyperparameters.
实现代码:
1
2
3
4
5
6
7
8
9
10
11
12
13
14
15
16
17
18
19
20
21
22
23
24
25
26
27
28
29
30
31
32
33
34
35
36
37
38
39
40
41
42
43
44
45# The identity block 函数
def identity_block(X, f, filters, stage, block):
"""
Implementation of the identity block as defined in Figure 3
Arguments:
X -- input tensor of shape (m, n_H_prev, n_W_prev, n_C_prev)
f -- integer, specifying the shape of the middle CONV's window for the main path
filters -- python list of integers, defining the number of filters in the CONV layers of the main path
stage -- integer, used to name the layers, depending on their position in the network
block -- string/character, used to name the layers, depending on their position in the network
Returns:
X -- output of the identity block, tensor of shape (n_H, n_W, n_C)
"""
# defining name basis
conv_name_base = 'res' + str(stage) + block + '_branch'
bn_name_base = 'bn' + str(stage) + block + '_branch'
# Retrieve Filters
F1, F2, F3 = filters
# Save the input value. You'll need this later to add back to the main path.
X_shortcut = X
# First component of main path
X = Conv2D(filters = F1, kernel_size = (1, 1), strides = (1,1), padding = 'valid', name = conv_name_base + '2a', kernel_initializer = glorot_uniform(seed=0))(X)
X = BatchNormalization(axis = 3, name = bn_name_base + '2a')(X)
X = Activation('relu')(X)
# Second component of main path
X = Conv2D(filters = F2, kernel_size = (f,f), strides = (1,1), padding = 'same', name = conv_name_base + '2b', kernel_initializer = glorot_uniform(seed=0))(X)
X = BatchNormalization(axis = 3, name = bn_name_base + '2b')(X)
X = Activation('relu')(X)
# Third component of main path
X = Conv2D(filters = F3, kernel_size = (1,1), strides = (1,1), padding = 'valid', name = conv_name_base + '2c', kernel_initializer = glorot_uniform(seed=0))(X)
X = BatchNormalization(axis = 3, name = bn_name_base + '2c' )(X)
# Final step: Add shortcut value to main path, and pass it through a RELU activation
X = Add()([X,X_shortcut])
X = Activation("relu")(X)
return X最后的 X 加上 X_shoutcut 应该使用 Keras 内置的 Add()([]) 函数,否则后面会报错:’Tensor’ object has no attribute ‘_keras_history’
- The first CONV2D has $F_1$ filters of shape (1,1) and a stride of (1,1). Its padding is “valid” and its name should be
The convolutional block(输入/输出维度不相同)
当输入输出维度不相同时,在 shourtcut 这条路径使用一个卷积操作来使得维度相同。

各层的细节:
First component of main path:
- The first CONV2D has $F_1$ filters of shape (1,1) and a stride of (s,s). Its padding is “valid” and its name should be
conv_name_base + '2a'. - The first BatchNorm is normalizing the channels axis. Its name should be
bn_name_base + '2a'. - Then apply the ReLU activation function. This has no name and no hyperparameters.
Second component of main path:
- The second CONV2D has $F_2$ filters of (f,f) and a stride of (1,1). Its padding is “same” and it’s name should be
conv_name_base + '2b'. - The second BatchNorm is normalizing the channels axis. Its name should be
bn_name_base + '2b'. - Then apply the ReLU activation function. This has no name and no hyperparameters.
Third component of main path:
- The third CONV2D has $F_3$ filters of (1,1) and a stride of (1,1). Its padding is “valid” and it’s name should be
conv_name_base + '2c'. - The third BatchNorm is normalizing the channels axis. Its name should be
bn_name_base + '2c'. Note that there is no ReLU activation function in this component.
Shortcut path:
- The CONV2D has $F_3$ filters of shape (1,1) and a stride of (s,s). Its padding is “valid” and its name should be
conv_name_base + '1'. - The BatchNorm is normalizing the channels axis. Its name should be
bn_name_base + '1'.
Final step:
- The shortcut and the main path values are added together.
- Then apply the ReLU activation function. This has no name and no hyperparameters.
实现的代码为:
1
2
3
4
5
6
7
8
9
10
11
12
13
14
15
16
17
18
19
20
21
22
23
24
25
26
27
28
29
30
31
32
33
34
35
36
37
38
39
40
41
42
43
44
45
46
47
48
49
50
51# The convolutional block 函数
def convolutional_block(X, f, filters, stage, block, s = 2):
"""
Implementation of the convolutional block as defined in Figure 4
Arguments:
X -- input tensor of shape (m, n_H_prev, n_W_prev, n_C_prev)
f -- integer, specifying the shape of the middle CONV's window for the main path
filters -- python list of integers, defining the number of filters in the CONV layers of the main path
stage -- integer, used to name the layers, depending on their position in the network
block -- string/character, used to name the layers, depending on their position in the network
s -- Integer, specifying the stride to be used
Returns:
X -- output of the convolutional block, tensor of shape (n_H, n_W, n_C)
"""
# defining name basis
conv_name_base = 'res' + str(stage) + block + '_branch'
bn_name_base = 'bn' + str(stage) + block + '_branch'
# Retrieve Filters
F1, F2, F3 = filters
# Save the input value
X_shortcut = X
##### MAIN PATH #####
# First component of main path
X = Conv2D(F1, (1, 1), strides = (s,s), name = conv_name_base + '2a', kernel_initializer = glorot_uniform(seed=0))(X)
X = BatchNormalization(axis = 3, name = bn_name_base + '2a')(X)
X = Activation('relu')(X)
# Second component of main path
X = Conv2D(F2, (f, f), strides = (1,1), padding = 'same', name = conv_name_base + '2b', kernel_initializer = glorot_uniform(seed=0))(X)
X = BatchNormalization(axis = 3, name = bn_name_base + '2b')(X)
X = Activation('relu')(X)
# Third component of main path
X = Conv2D(F3, (1, 1), strides = (1,1), name = conv_name_base + '2c', kernel_initializer = glorot_uniform(seed=0))(X)
X = BatchNormalization(axis = 3, name = bn_name_base + '2c')(X)
##### SHORTCUT PATH ####
X_shortcut = Conv2D(F3, (1,1), strides = (s,s), name = conv_name_base + '1', kernel_initializer = glorot_uniform(seed=0))(X_shortcut)
X_shortcut = BatchNormalization(axis = 3, name = bn_name_base + '1' )(X_shortcut)
# Final step: Add shortcut value to main path, and pass it through a RELU activation (≈2 lines)
X = X = Add()([X,X_shortcut])
X = Activation('relu')(X)
return X- The first CONV2D has $F_1$ filters of shape (1,1) and a stride of (s,s). Its padding is “valid” and its name should be
建立一个 50 层的残差网络模型

这个模型的细节为:
- Zero-padding pads the input with a pad of (3,3)
- Stage 1:
- The 2D Convolution has 64 filters of shape (7,7) and uses a stride of (2,2). Its name is “conv1”.
- BatchNorm is applied to the channels axis of the input.
- MaxPooling uses a (3,3) window and a (2,2) stride.
- Stage 2:
- The convolutional block uses three set of filters of size [64,64,256], “f” is 3, “s” is 1 and the block is “a”.
- The 2 identity blocks use three set of filters of size [64,64,256], “f” is 3 and the blocks are “b” and “c”.
- Stage 3:
- The convolutional block uses three set of filters of size [128,128,512], “f” is 3, “s” is 2 and the block is “a”.
- The 3 identity blocks use three set of filters of size [128,128,512], “f” is 3 and the blocks are “b”, “c” and “d”.
- Stage 4:
- The convolutional block uses three set of filters of size [256, 256, 1024], “f” is 3, “s” is 2 and the block is “a”.
- The 5 identity blocks use three set of filters of size [256, 256, 1024], “f” is 3 and the blocks are “b”, “c”, “d”, “e” and “f”.
- Stage 5:
- The convolutional block uses three set of filters of size [512, 512, 2048], “f” is 3, “s” is 2 and the block is “a”.
- The 2 identity blocks use three set of filters of size [512, 512, 2048], “f” is 3 and the blocks are “b” and “c”.
- The 2D Average Pooling uses a window of shape (2,2) and its name is “avg_pool”.
- The flatten doesn’t have any hyperparameters or name.
- The Fully Connected (Dense) layer reduces its input to the number of classes using a softmax activation. Its name should be
'fc' + str(classes).
实现代码为:
1 | # 50 层的残差网络模型 |
进行训练和预测
建立模型
1
model = ResNet50(input_shape = (64, 64, 3), classes = 6)
编译模型
1
model.compile(optimizer='adam', loss='categorical_crossentropy', metrics=['accuracy'])
训练模型
载入数据
1
2
3
4
5
6
7
8
9
10
11
12
13
14
15
16X_train_orig, Y_train_orig, X_test_orig, Y_test_orig, classes = load_dataset()
# Normalize image vectors
X_train = X_train_orig/255.
X_test = X_test_orig/255.
# Convert training and test labels to one hot matrices
Y_train = convert_to_one_hot(Y_train_orig, 6).T
Y_test = convert_to_one_hot(Y_test_orig, 6).T
print ("number of training examples = " + str(X_train.shape[0]))
print ("number of test examples = " + str(X_test.shape[0]))
print ("X_train shape: " + str(X_train.shape))
print ("Y_train shape: " + str(Y_train.shape))
print ("X_test shape: " + str(X_test.shape))
print ("Y_test shape: " + str(Y_test.shape))训练
1
model.fit(X_train, Y_train, epochs = 2, batch_size = 32)
进行预测
1
2
3preds = model.evaluate(X_test, Y_test)
print ("Loss = " + str(preds[0]))
print ("Test Accuracy = " + str(preds[1]))
测试自己的图片
1 | img_path = 'images/my_image.jpg' |
对模型进行总览
表格
1
model.summary()
位图
1
2
plot_model(model, to_file='model.png')
SVG(model_to_dot(model).create(prog='dot', format='svg'))
结论
- 实际中非常深的普通网络不起作用,因为梯度下降它们很难训练
- 跳跃连接帮忙解决跳跃连接问题,它们也使得残差网络很容易学习 identity function
- 有两种主要的组块:The identity block and the convolutional block
- 把这些组块堆叠起来可以形成很深的残差网络


